
English Paper Piecing by Machine for Island Batik
It is with mixed emotions that I write this final blog of 2021 as I elected not to apply as an Island Batik Ambassador for 2022. The IBA challenges during the last four years have stretched my creativity, knowledge and experiences. I’m grateful to Island Batik, their industry partners, the other ambassadors, Natasha, Jerry and Elizabeth for their support, encouragement and friendships. I look forward to a year filled with pattern design, fiber art creations and a host of teaching and speaking engagements. I hope you continue to follow along.
Island Batik along with their industry partners, Hobbs Batting, Schmetz Needles and Aurifil Thread provided the batik fabric, batting, sewing machine needles and thread used in this project for my role as an Island Batik Ambassador.

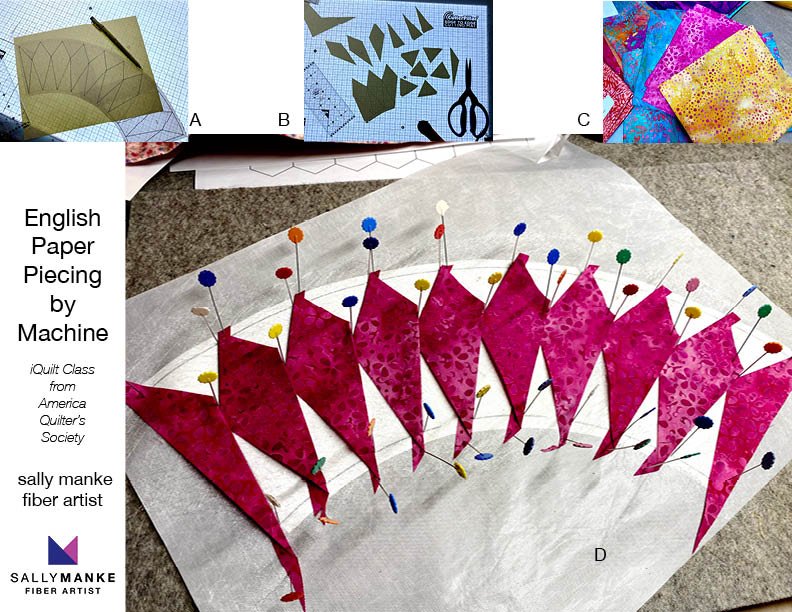
English Paper Piecing (commonly called EPP) is a method of stabilizing fabric around a heavy paper shape before hand sewing the pieces together to create intricately pieced designs. It provides excellent accuracy and precision piecing. Hand sewing is really not for me…fortunately there was an option. The American Quilters Society’s iQuilt classes included Karen K. Stone’s English Paper Piecing by Machine. A.) Beginning with a very basic hexagon pattern I placed pins through the pattern into a wool pressing board. B.) Each hexie has three edges pressed in before being ‘woven’ between the pins. C.) The pieces are checked for a tight fit. D.) The mini practice project is ready for the next step.

Continuing with my sample project on English Paper Piecing by Machine. A.) Each of the pressed-in edges gets a small bead of Elmer’s Glue. I used the clear but it is washed out so any Elmer’s School Glue will work. B.) The small iron dries and sets the glue. C.) The back of machine-stitched paper piecing looks different than traditional. D.) The mini practice project is ready for the machine.

It’s time for the machine stitching on the English Paper Piecing by Machine sample project. A.) Stitching started using a narrow, machine stitch with invisible thread as directions indicated. That process looked messy to me. The second try was to use a straight stitch which also wasn’t the process I wanted to use. B.) With all the stitches from photo A removed and a new idea, the project was auditioned on a background color. C.) With the background quilted and finished, the hexagons are secured, attached and quilted in one final step by machine stitching.

The sample project is completed. Directions, with a few alterations, are from the American Quilters Society’s iQuilt class by Karen K. Stone. A.) View of quilting on the back of the project. B.) Completed sample project. C.) With a cup of hot cocoa, plans begin for the actual project for this challenge.

Traditional EPP is often shaped shaped. It’s time to shake it up a bit using the same technique but with a variety of shapes.
With the sample project completed, it’s time to start on the real project. A.) Using the template provided in the iQuilt class materials, the templates are traced onto card stock. The Cutterpillar Glow Ultra made this process easier. B.) Card stock is accurately cut with Creative Grids Itty Bitty Eights ruler and a rotary cutter on the Cutterpillar clear cutting mat. C.) Kathy Engle’s Flutter Fly collection from Island Batik was selected for this project. D.) Focal kite pieces are positioned with pins inserted in the wool pressing mat.
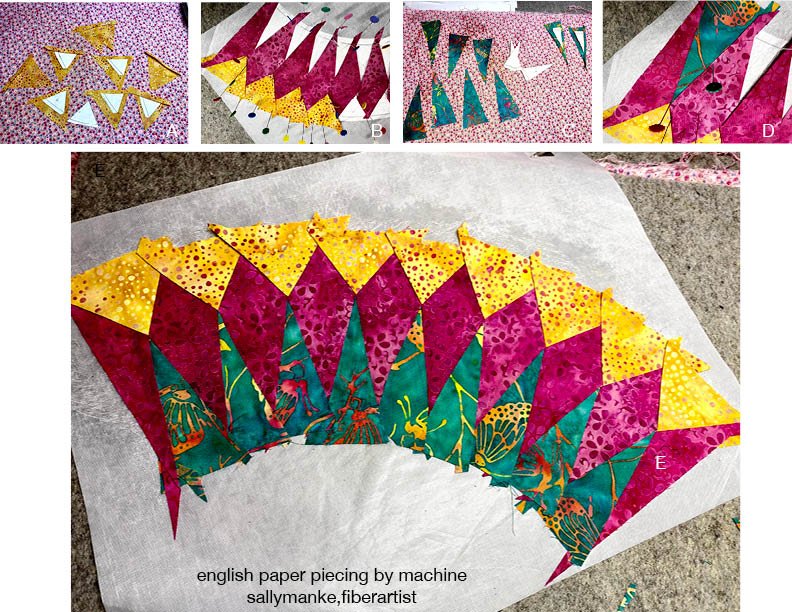
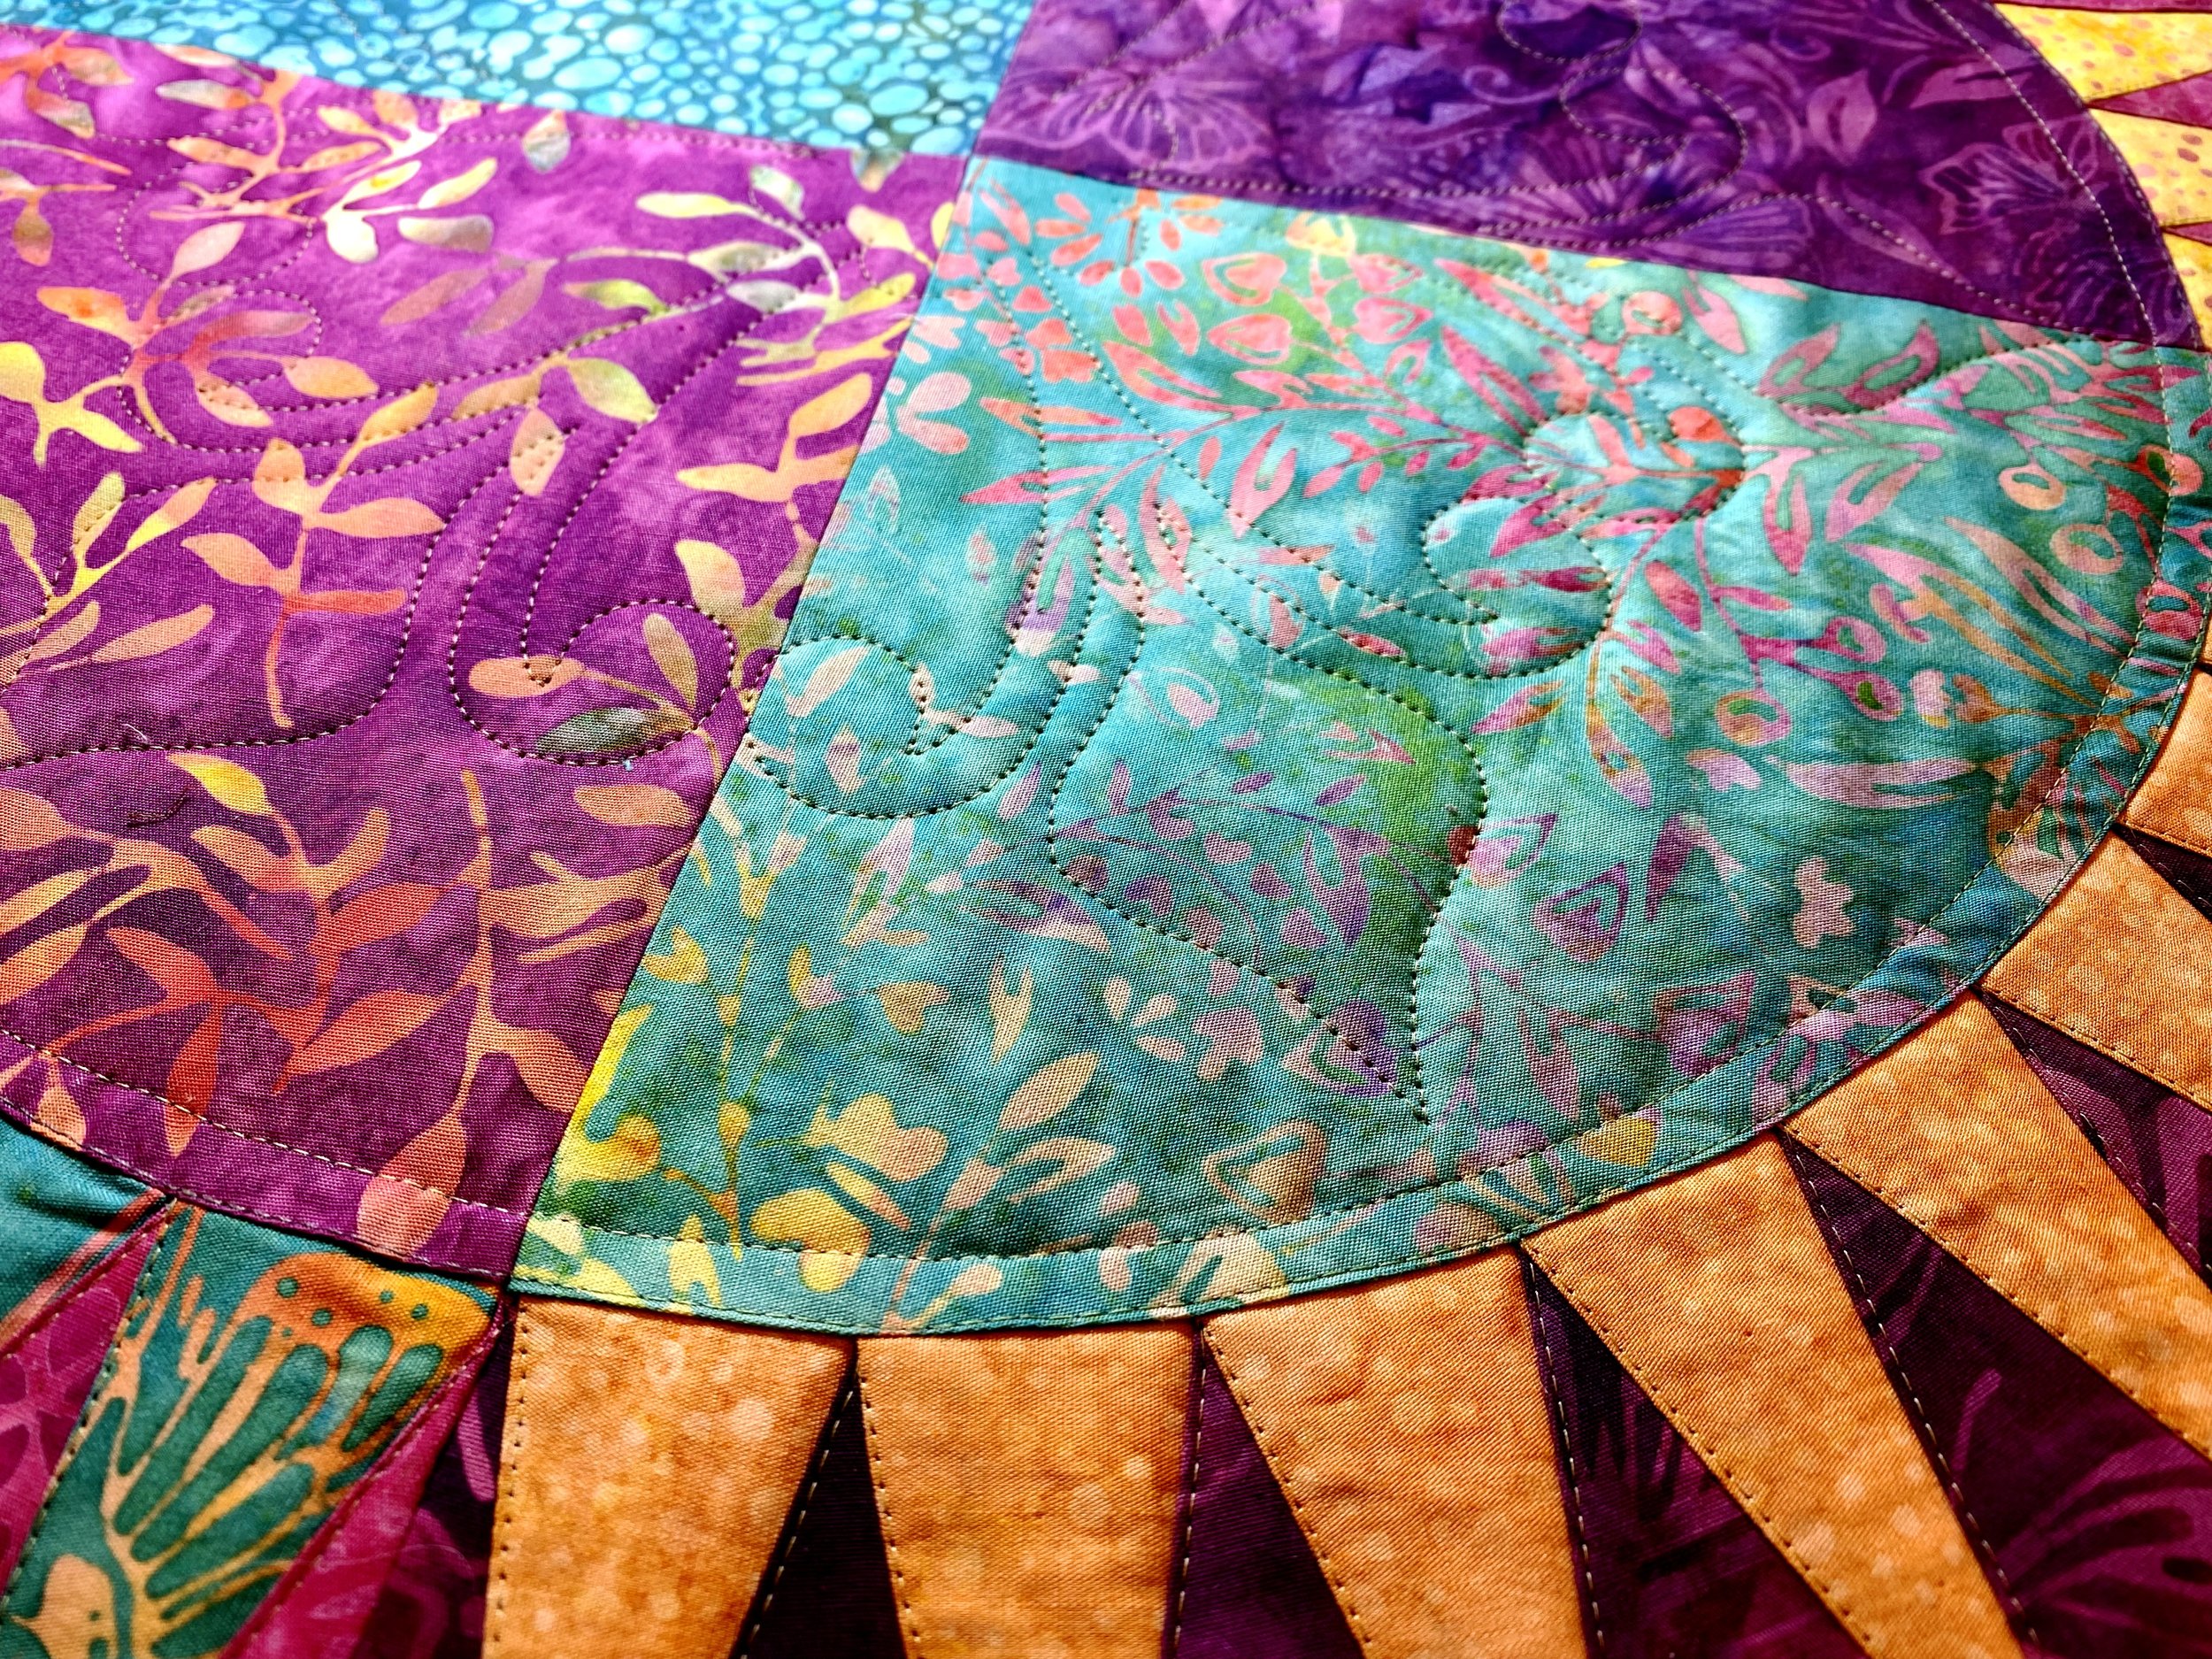
Kathy Engle’s Flutter Fly collection from Island Batik is certainly adding a zing of color to this project. A.) Nine triangular EPP sections are spray starched, pressed and have one edge turned in on the card stock templates. B.) Gold triangles are woven over and under kite-shaped pieces following the pins in the pattern. C.) Tall triangles are prepared with a third color choice. D.) The third color tucked into an arch shape. E.) The first arch was completed and ready to become a square quilt block.

Although this is an EPP by Machine, we are still not ready for machine stitching. A.) Auditioning more Flutter Fly Island Batiks for the interior and exterior of the arch. B.) Starch fabric is pressed around the curved edge of the template. C.) Outside corner fabric in place and secured with 1/4” Seam a Seam II. D.) Inside corner fabric is starched and pressed over the template. E.) There are two points that don’t meet my standards. DEEP BREATH. My goal is to get the next three blocks with ALL the perfect points.

The original plan was to create one block and call it good. All that changed when I learned that EPP by Machine is something I enjoy. A.) The second arch has the same colors with the outside triangle fabrics reversed. B.) Happiness over PERFECT points encourages me to continue. C.) Additional blocks introduce more colors from the Flutter Fly collection. D.) The four arches are completed and ready for background colors. E.) All colors selected and ready to be attached.

With the four blocks assembled, border selection begins. A.) Auditioning the size of borders to start. B.) An inner thin border with wider outside borders works best but I’m still auditioning colors. C.) The thin orange border stitched in place. D.) Possible outside border…not my favorite. E.) Ready to quilt.
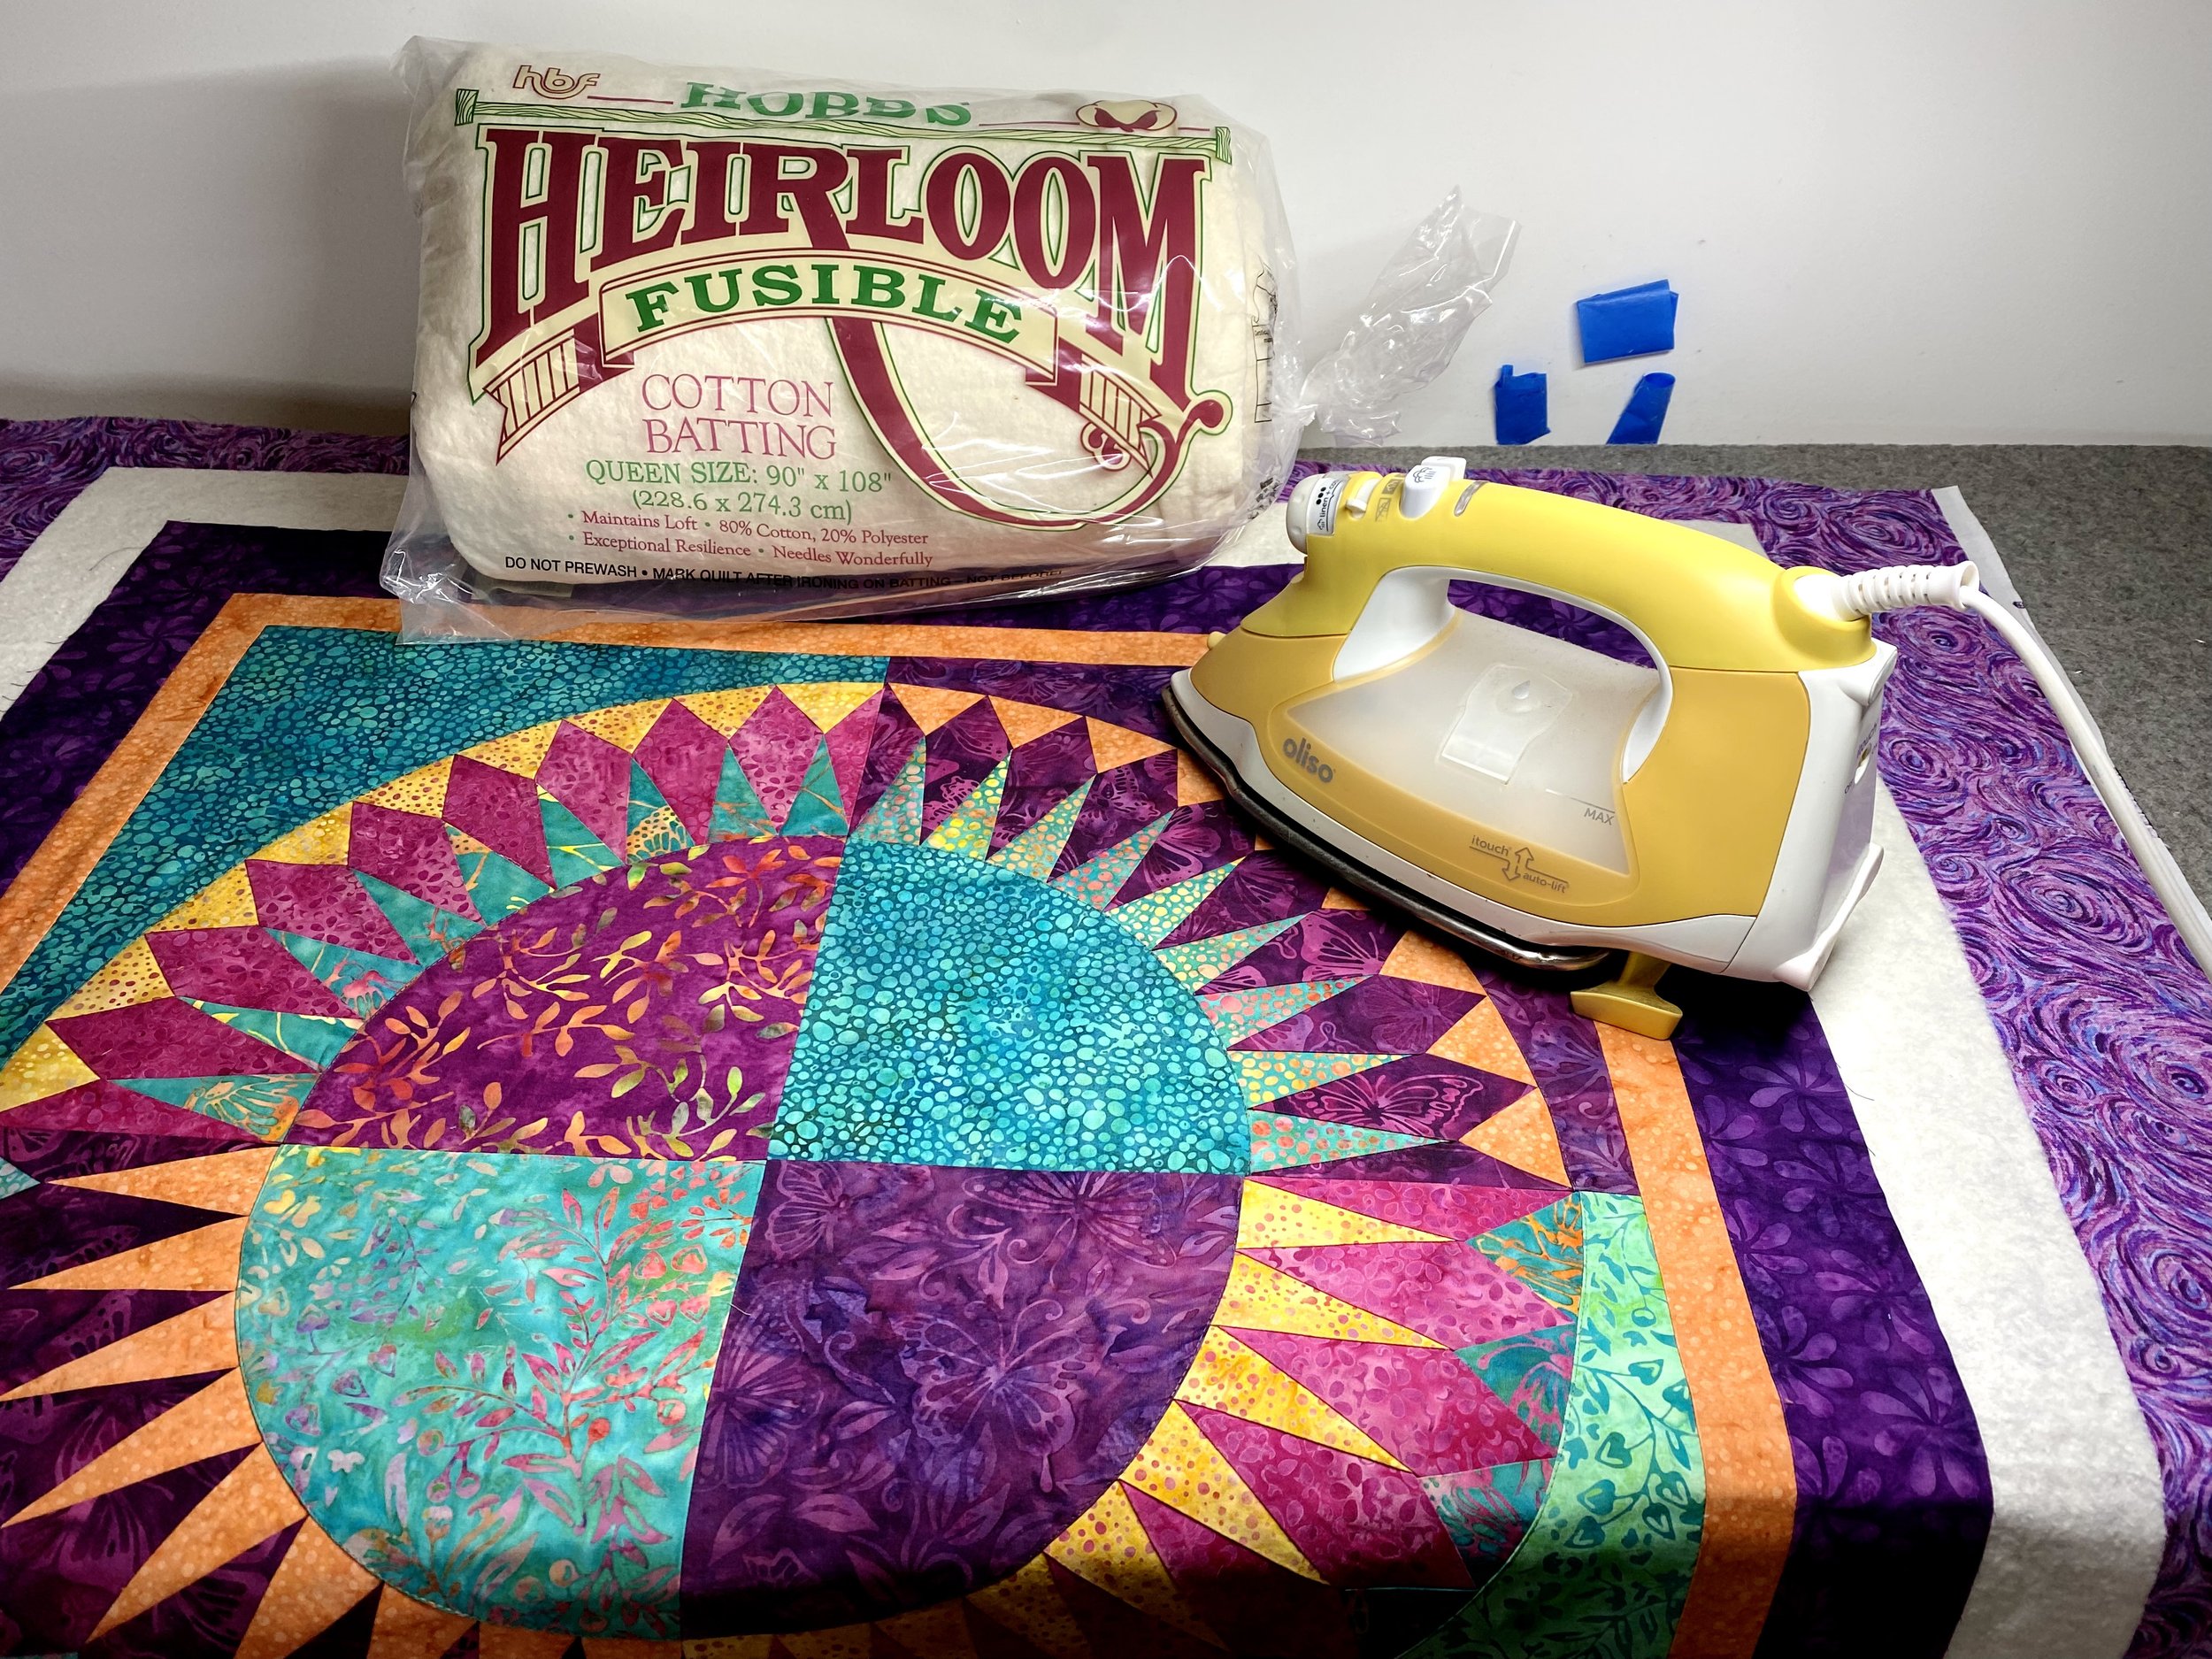
The quilting on this project will also double as the machine stitching hold the pieces together. I rarely quilt on my Bernina 770 but this project is perfect for a domestic machine. Happily, there is no need to baste the layers with the Hobbs Heirloom FUSIBLE batting. I just layered the backing, batting and top then fused them together. The easy-to-use batting can be repositioned if there’s a wrinkle.
Getting close to the finish line, the quilting was completed on my Bernina 770 domestic machine (all EPP sections) as well as the Handi Quilter Amara with Pro-Stitcher (center quilting). Aurifil 80 wt cotton thread was used on both machines.
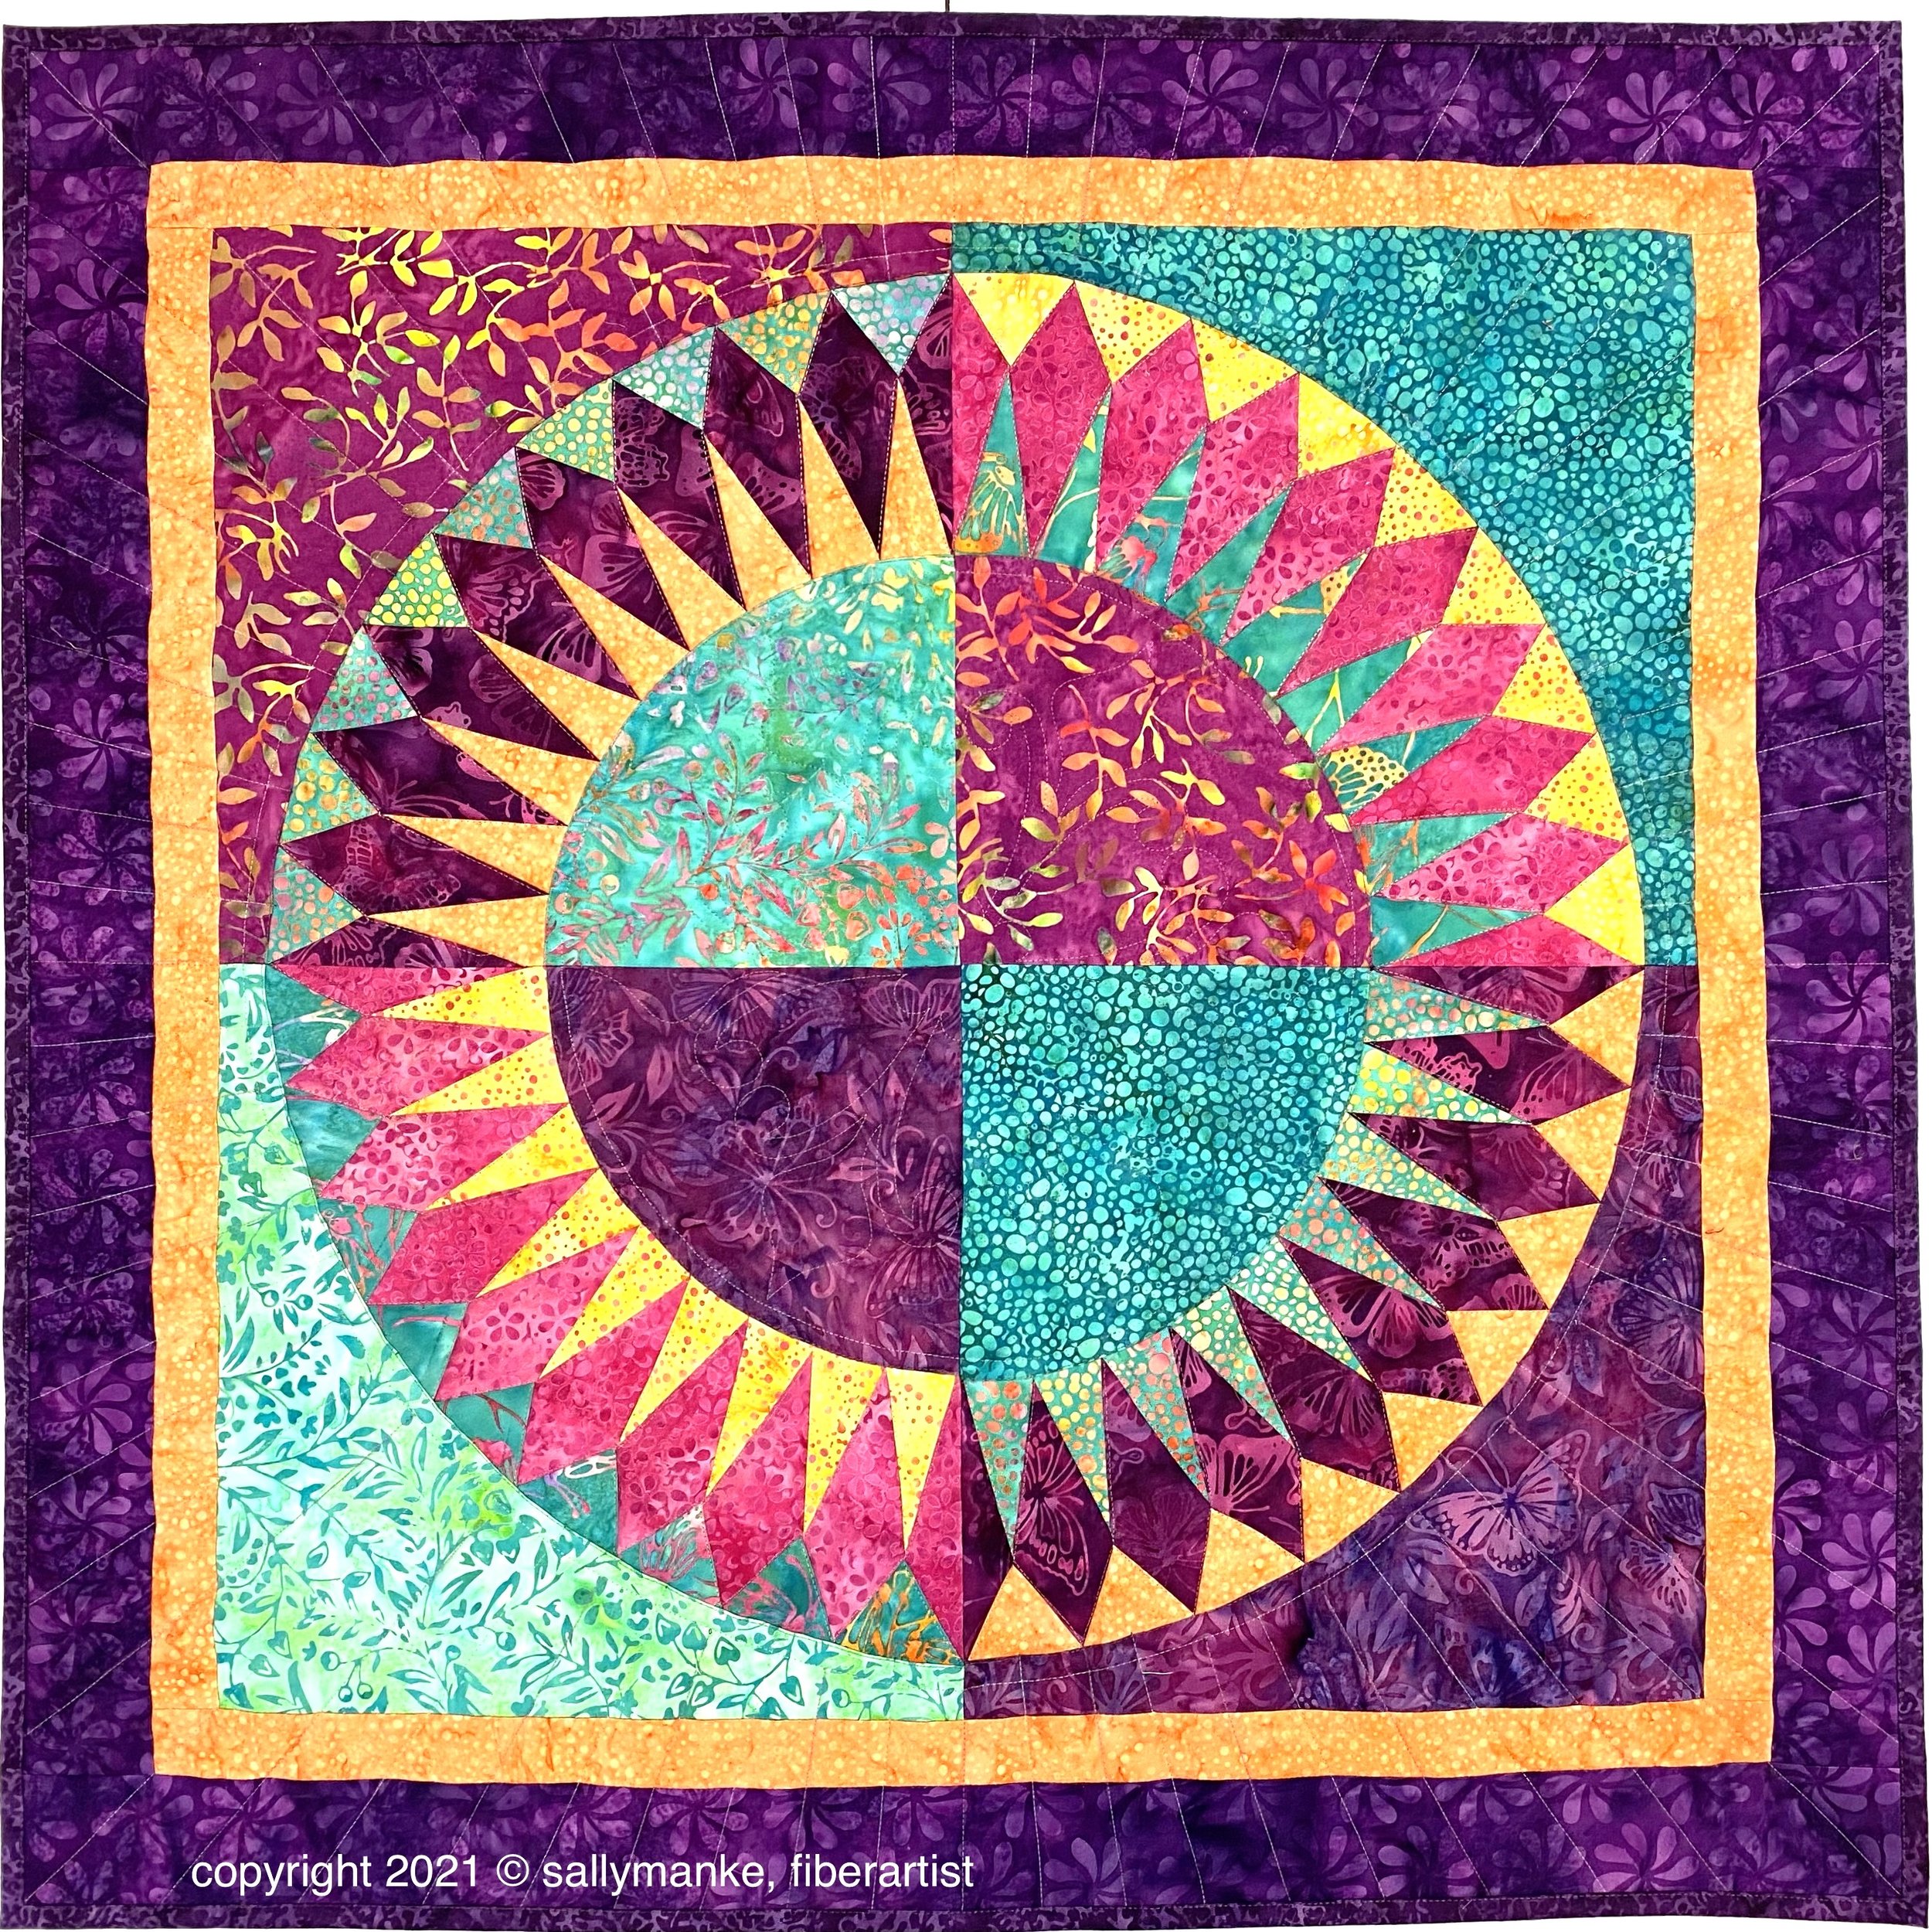
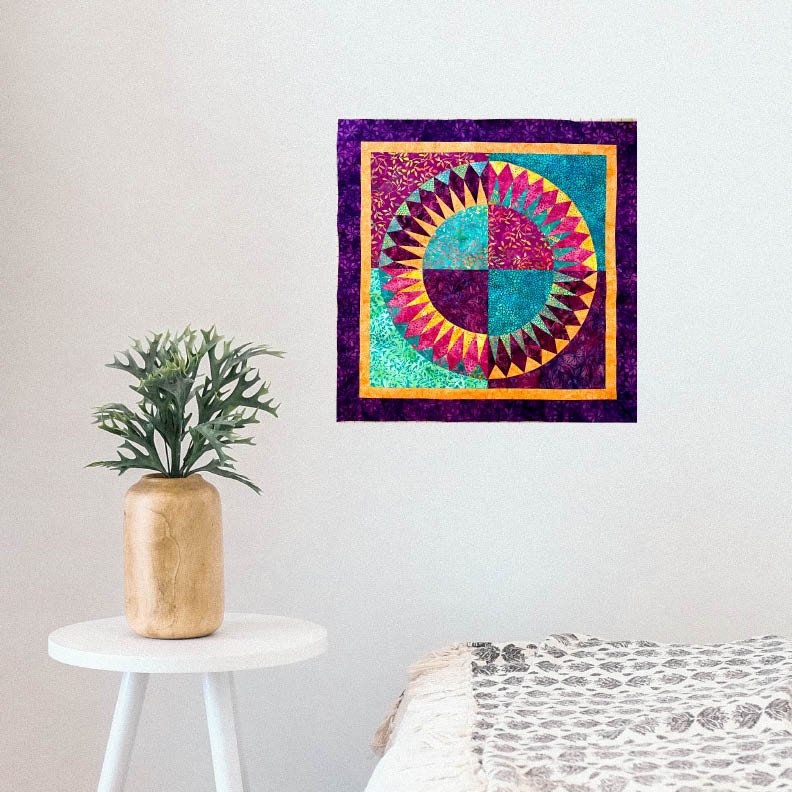
Thank heavens for the American Quilters Society’s iQuilt class by Karen K. Stone on English Paper Piecing by MACHINE. I am so NOT a fan of hand stitching as I much prefer standing or moving rather than sitting and this project allowed for that. The piece wandered FAR from the actual class project but allowed for creative time to use this colorful Flutter Fly collection by Kathy Engle for Island Batik. Rather than the recommended glue, I used 1/4” Steam-a-Seam II to secure pieces before stitching. Securing the pieces and the quilting was completed in the same step which was another change from the actual class instructions. This project could be a wall hanging or a table topper and finished at 29” X 29”. Find it in my Etsy Shop.

What a perfect way to add a sparkle of color to a modern decor.
Visit the links below to see the English Paper Piecing projects the other ambassadors created this month.
Megan Best ~ Best Quilter
Pamela Boatright ~ PamelaQuilts
Elizabeth DeCroos ~ Epida Studio
Jennifer Eubank ~ Archipelago Quilting
Jennifer Fulton ~ The Inquiring Quilter
Preeti Harris ~ Sew Preeti Quilts
Joanne Hart ~ Unicorn Harts
Mania Hatziioannidi ~ Mania For Quilts
Jane Hauprich ~ Stitch By Stitch Custom Quilting
Connie Kauffman ~ Kauffman Designs
Emily Leachman ~ The Darling Dogwood
Denise Looney ~ For The Love Of Geese
Leah Malasky ~ Quilted Delights
Sally Manke ~ Sally Manke, Fiber Artist
Maryellen McAuliffe ~ Mary Mack Made Mine
Claudia Porter ~ Create with Claudia
Gail Renna ~ Quilt Haven Threads
Brianna Roberts ~ Sew Cute and Quirky
Michelle Roberts ~ Creative Blonde
Gail Sheppard ~ Quilting Gail
Published by Sally Manke, Fiber Artist
Sally Manke's mission is to delight others with textile art that exemplifies her passion for joyful, creative expression through color and texture. She is a speaker, teacher, pattern designer, Island Batik Ambassador and fiber artist. Contact her to book a workshop or trunk show at https://www.sallymanke.com/contact